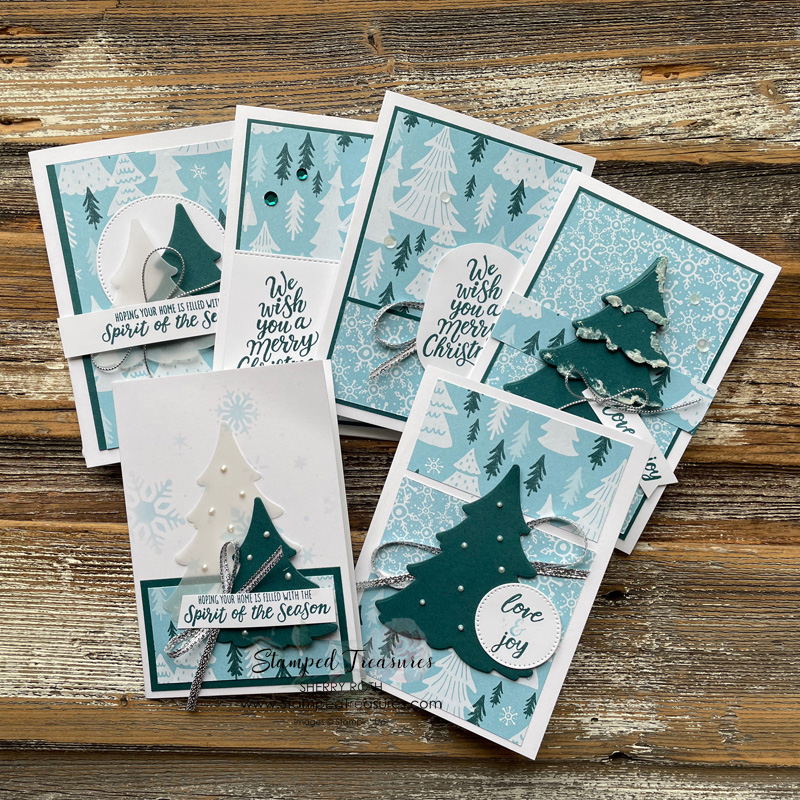
In today’s post I’m sharing 6 Christmas cards from one 6″ x 12″ piece of patterned paper. These cards are note card sized (3-1/2″ x 5″ folded). A little smaller than a regular A2 sized handmade card, which is 4-1/4″ x 5-1/2″ folded. However, the ideas can all be used on a standard sized card without altering any of the measurements. There will just be a wider border on the cards.
The thing I love about our Note Cards & Envelopes is that they come pre cut and scored. It saves you 2 steps! There are 20 cards & 20 envelopes in a package. They make for quick & easy cards! I always have lots of these on hand.
Here are the basic consumable supplies you’ll need to get started (a full supply list is included at the bottom of this post):
- 6 Notecards & Envelopes (or 6 standard sized white card bases)
- a 6″ x 12 ” piece of patterned paper (I used the A Walk in the Forest for one of my sets and Winter Meadow for the other)
- 1 sheet of 8-1/2″ x 11″ coordinating card stock (Pretty Peacock and Lost Lagoon was used for the samples)
- White Cardstock – you’ll need a few scraps or about 1/2 a sheet
- Vellum – scraps for die cutting
- Ribbon and/or twine
- Embellishments
- Stamp set/bundle – the Merriest Trees bundle was used for both these samples
Before you start creating check out the video posted below to see how I cut the patterned paper and sheet of card stock. In the video I use Winter Meadow DSP but the cards are the same design.
The cards in more details…
Tag Card Measurements:
- Notecard
- Pattern Paper: 3″ x 4-1/2″
- Coordinating Cardstock: 3-1/8″ x 4-5/8″
- Basic White: 2-1/2″ of the tag from the Merriest Trees dies
- Ribbon: 4″
- Silver Twine: 6″
- Sequins: x3
Snowy Tree Card Measurements:
- Notecard
- Pattern Paper: 3″ x 4-1/2″ and 3/4″ x 3-1/2″ strip (if you have it)
- Coordinating Card Stock: 3-1/8″ x 4-5/8″ and die cut trees (cut from the leftover card stock)
- Basic White: 1/2″ x 3″
- Silver Twine: 6″
Spirit of the Season Card Measurements:
- Notecard
- Pattern Paper: 3″ x 4-1/2″ (cut down to 2-7/8″ x 4-1/2″ and use the narrow strip for the inside)
- Coordinating Card Stock: 1/2″ x 4-1/2″ and 2-1/2″ x 2-3/4″ for die cutting a tree
- Vellum: 2-1/2″ x 2-3/4″ for die cutting a tree
- Basic White: 4th smallest Stylish Shapes circle (about 2-1/8″) and strip for greeting
- Silver Twine: 8″
We Wish You a Merry Christmas Card Measurements:
- Notecard
- Pattern Paper: 3″ x 4-1/2″ (cut at 3″ and flip over smaller piece)
- Coordinating Card Stock: 1/2″ x 3″ and 3-1/8″ x 4-5/8″
- Basic White: Modern Oval Shape
- Silver Ribbon: about 10″
- Sequins: x3
Love & Joy Card Measurements:
- Notecard
- Pattern Paper: 1-1/2″ x 3″ (x3)
- Coordinating Card Stock: 3″ x 4″ for die cutting tree
- Basic White: die cut 2nd smallest circle from Stylish Shapes Dies (about 1-1/4″)
- Silver Ribbon: about 10″
Measurements:
- Notecard
- Pattern Paper: 1-1/2″ x 3″
- Coordinating Card Stock: 1-3/4″ x 3-1/4″ and 2-1/2″ x 2-3/4″ for die cutting tree
- Vellum: 3″ x 4″ for die cutting tree
- Basic White: 1/2″ strip
- Silver Ribbon: about 8″
These cards are also part of my personal challenge to use up an entire package of patterned paper. You can see what else I’ve created using the A Walk in the Forest patterned paper in the posts linked below.
- A Christmas One Sheet Wonder
- 2 Christmas Cards using the Patchwork Pieces Dies
- Christmas Scrapbook Layout
- 12 Christmas Cards from One 12″x12″
Until next time,

Shopping List
Click on any of the images to shop my Canadian online store or to find out more information about any of these products. In addition to the supplies listed below, I also used the Abundant Beauty Decorative Masks (162331) and a blending brush.


Leave a Reply