Welcome to the Scrapbooking Global March 2023 blog hop. Thank you so much for joining us. This months theme is creative backgrounds. I can’t wait to see what everyone created!
As part of the Scrapbooking Global design team we participate in a monthly blog hop and challenges but anyone can join in if they’d like. We’d love to have you join us! Be sure to join the Scrapbooking Global – Stampin’ Up! Facebook Group so you know when the sign up starts for our next hop.
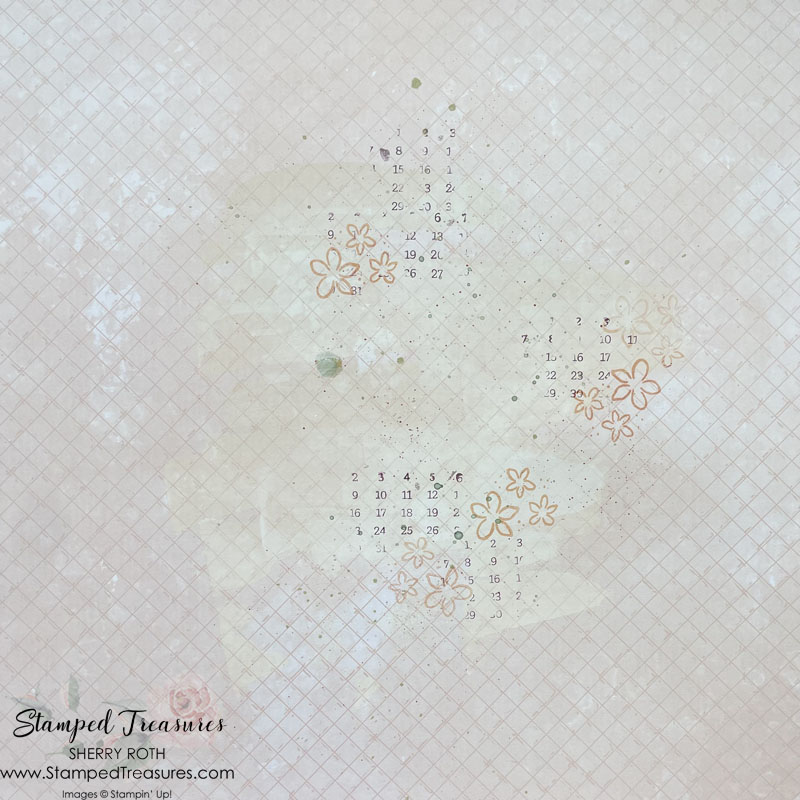
I was so excited to see this months creative backgrounds theme and decided that I would just play. Here’s a little peek at the background I created.

The Background

To create the background I first started with a layer of Gesso on a piece of Petal Pink dsp from the Design a Daydream paper pack. It was swiped on using an old gift card and closer to the middle of the page. My initial thought was that I would use the packaging technique over top of it. The Gesso provides a barrier to protect the dsp so that it wouldn’t be ruined by the moisture from the packaging technique. However, I changed my mind and decided to do something different.
After drying the Gesso with the heat tool, I splattered with my water painter and some old olive ink. Then again using the dark Blackberry Bliss blend. Then I took the numbered stamp from the Days to Remember stamp set and inked up only a portion of it with Blackberry Bliss ink and stamped it multiple times. I also didn’t mount the stamp on a block, I simply held it. The reason I didn’t mount it onto a block was because I was looking for an uneven image. You can see that some of the numbers didn’t show up, some are lighter than others… this was the look I was trying to achieve.
The second to last step to the background was to stamp the floral image from the Sweet Citrus stamp set using Petal Pink ink. To finish off the background, I used my snips and distressed around the edges (see photo below).

Additional Details
Because I only had one smaller square photo for the layout, I wanted to create something a bit more substantial to really bring the focus to the photo. So I chose three patterned papers from the Design a Daydream paper pack and cut some strips to add down the side and to mat my photo. A partial vellum circle was tucked under for a nice subtle addition.

To create the pocket for the tag I flipped over the matted photo and positioned the tag where I wanted it and then cut pieces of foam adhesive sheets to add around the tag and across the back. This creates a ‘pocket’ for the tag so it doesn’t fall too far down or move around too much.
One of the final steps was to add the faux stitching. I love the look of stitching on a layout but can’t be bothered to pull out my sewing machine. The Stitchery stamp set is a great solution. It was stamped using Staz On ink in a few different places on the layout. Then to finish it off, I stamped and die cut some flowers and added the heart pearls.
All of the supplies that I used to create this layout (apart from the olive dsp) came from my current Scrap Your Stash kit that I recently put together for an upcoming class. You can find all the details here. I’d love for you to join us!
Thanks so much for stopping by today. Be sure to head on over to Cheryl Taylor’s blog to see what she created and then hop along for more creative background inspiration.
Until next time,

Shopping List
Click on any of the images to shop my Canadian online store or to find out more about any of these products. In addition to the items listed below, I also used Gesso, a couple retired buttons and a scrap of pool party shimmer ribbon.


FABULOUS tip about the Gesso, so that we can add layers over it so that it doesn’t get all soggy. I do love how you used the stamp without mounting it, it just gives you more variation. I do that on my mixed media canvases BUT forget about doing it on the pages I create.
I am pleased that I am not the only one who does what you did , in creating a faux pocket… I also use pieces of our chipboard (packaging)
cut into strips to add dimension to my layouts without using foam strips. Thanks for sharing all your tips and I love the sound of your Scrap your Stash kit… Thanks again for joining us Cheers Shaz
Thanks so much Sharon. It was a fun challenge – got me thinking outside of my go to ideas.
Thanks for sharing the tip on the pocket tag. I’m always looking how to add my journaling in a more hidden way.
Great layout with all the bits & pieces. Love the asymmetrical calendar dates from your stamp.
Thanks Jill. I use this idea for a pocket tag a lot. It’s great if you don’t have room for your journaling or when the journaling is a bit more personal and you don’t want everyone reading it.
I love the distressed look of your page and your background! so soft and pretty. Great idea with the tag pocket too!
Thank you so much Beth!
Love the gesso look and yep now going to buy that Stitchery stamp set! All of you girls on this blog hop have used it so well and now I NEED it! Fab LO!
LOL I haven’t used it enough and it will likely retire now that I’ve started!
Man, I really need to get that STitchery stamp set!! It’ looks sooooo good. AND I love the technique of not mounting the stamp – I’ve never done that before but I certainly will be now!! THankyou for the brilliant inspiration!! Love everything about your page.
This was my first attempt at not mounting my stamp and i’m happy with the results. I’ll definitely be doing it again. Thanks so much for the kind comments.