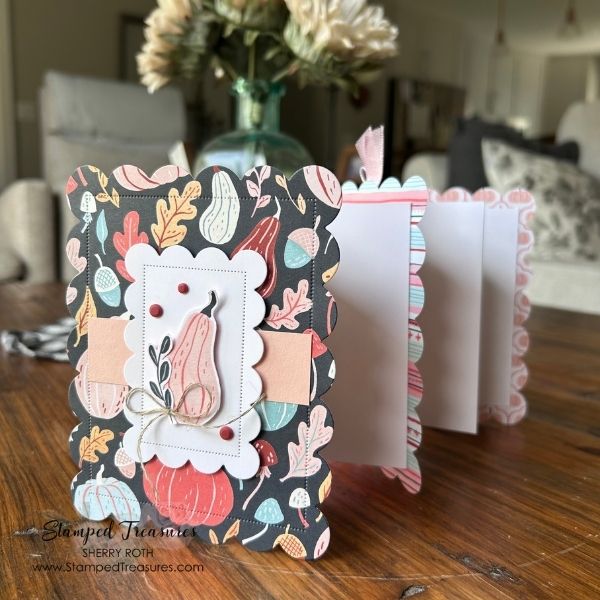
How to Make a Concertina Mini Album with Patterned Paper & Dies
I love a paper crafting project that looks impressive when it’s finished but is actually quite simple to put together—and this little concertina mini album definitely fits the bill!
For this project, I’m using some Stampin’ Up!’s Scalloped Christmas Cheer dies and Painted Patch DSP to create the covers and pages of a fun little accordion-style mini album. But don’t let the specific supplies I used limit you. You can recreate this album with any patterned paper and any larger rectangular-shaped die you have in your stash.
It’s one of those projects where the basic construction stays the same, but you can completely change the look simply by changing the paper, colours and embellishments.
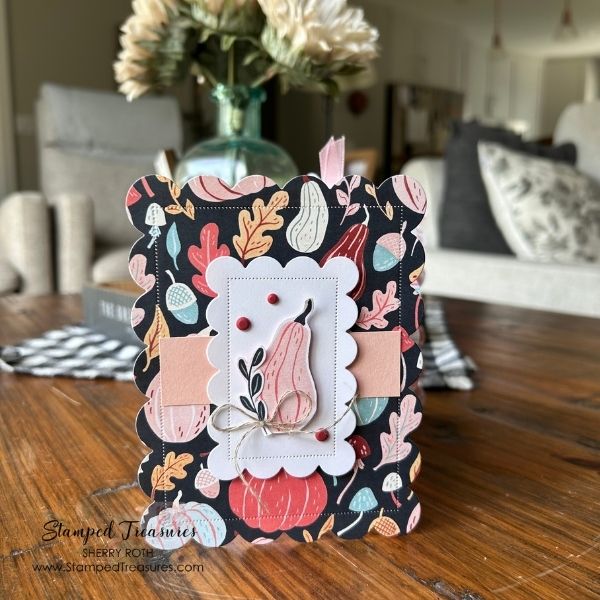
A Simple Formula for a Custom Mini Album
One of my favourite things about this album is that you don’t need a special mini album die or a complicated set of measurements. In the video, I show you how to determine the sizes you need based on the die you’re using. Once you know the size of your die-cut pieces, you can work out the dimensions of the cardstock pieces that create the accordion pages and the covers.
That means you can use the same basic construction to create albums for all occasions:
- Gratitude journal
- Christmas album
- To document a holiday or girls trip
- Vintage-inspired paper
- Grandma’s brag book
The options are endless!
The Concertina Construction
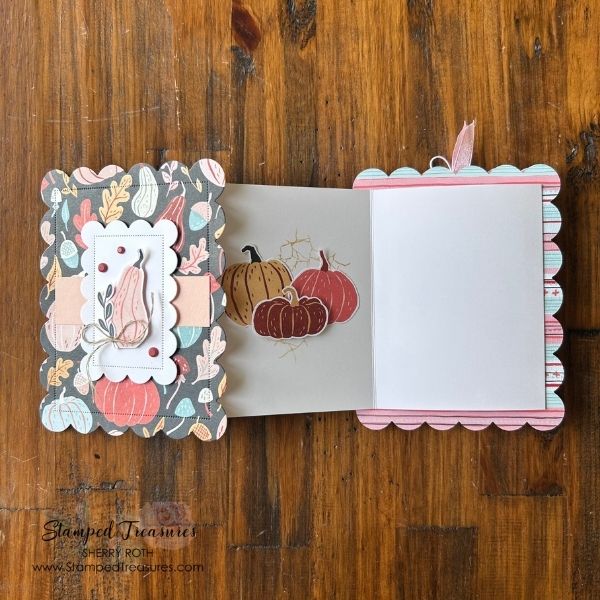
The album gets its name from the way the pages fold back and forth, creating a concertina or accordion effect. Once the base is scored and folded, the pages can be decorated with die-cut pieces, photos, journaling, pockets, tags or other little pieces of ephemera. And because the album folds up into a small package, it’s a great way to create a mini album without needing a huge amount of paper.
I also love that you can decide how much—or how little—you want to add to the finished album. Keep it simple with patterned paper and a few embellishments, or turn it into a much more interactive project with pockets and tuck-ins.
Watch the Video Tutorial
In the video, I’ll walk you through the entire process from determining your measurements to assembling the finished album.
I’ll show you:
- How to determine the measurements based on your chosen die
- How to prepare the cardstock pieces
- How to score and fold the concertina pages
- How to assemble the album
- How to decorate the album
- How I put my fall-themed album together
Once you’ve made one, you’ll have the basic formula down—and then you can start experimenting!
Make It Your Own
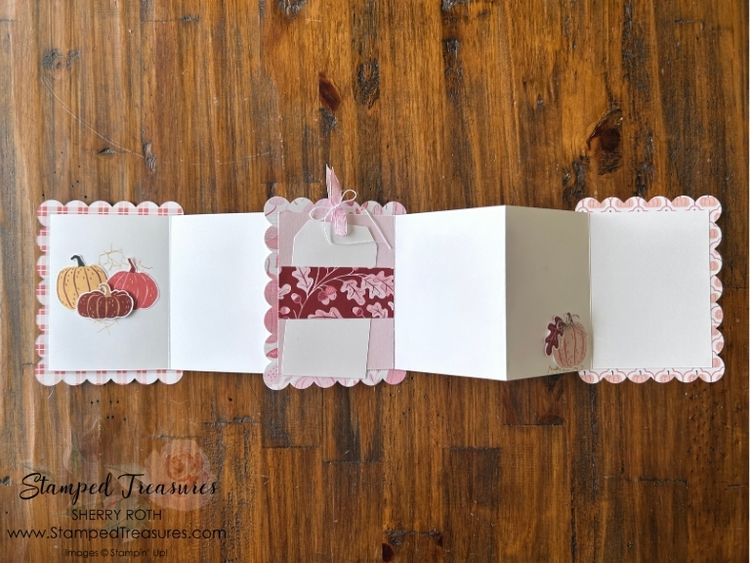
This would be such a fun project to customize for different occasions. Try making one as a small photo album, a travel memory book, a seasonal journal or even a little gift album. You could add photographs, favourite quotes, journaling, recipes, ticket stubs or other memorabilia. And don’t feel like you need to save it for a special occasion. Sometimes it’s fun to simply make a little album because you love the paper!
That’s one of the reasons I enjoy projects like this so much. You can start with a basic construction and let your supplies and creativity take it in a completely different direction. So grab some patterned paper and a larger rectangular die from your stash and give this concertina mini album a try!
Happy crafting!

Supply List
Click on any of the images to shop my Canadian online store or to find out more information about any of these products. In addition to these, I also used some retired ribbon and gems.
![Echoes Of Detail Photopolymer Stamp Set [ 170046 ]](https://assets1.tamsnetwork.com/images/EC042017NF/170046s.jpg "Echoes Of Detail Photopolymer Stamp Set [ 170046 ]")
![Scalloped Christmas Cheer Dies [ 168544 ]](https://assets1.tamsnetwork.com/images/EC042017NF/168544s.jpg "Scalloped Christmas Cheer Dies [ 168544 ]")
![Stylish Shapes Dies [ 159183 ]](https://assets1.tamsnetwork.com/images/EC042017NF/159183s.jpg "Stylish Shapes Dies [ 159183 ]")
![Painted Patch 12" X 12" (30.5 X 30.5 Cm) Designer Series Paper [ 168430 ]](https://assets1.tamsnetwork.com/images/EC042017NF/168430s.jpg "Painted Patch 12\" X 12\" (30.5 X 30.5 Cm) Designer Series Paper [ 168430 ]")
![Shimmering Stripes 12" X 12" (30.5 X 30.5 Cm) Specialty Paper [ 168197 ]](https://assets1.tamsnetwork.com/images/EC042017NF/168197s.jpg "Shimmering Stripes 12\" X 12\" (30.5 X 30.5 Cm) Specialty Paper [ 168197 ]")
![Linen Thread [ 104199 ]](https://assets1.tamsnetwork.com/images/EC042017NF/104199s.jpg "Linen Thread [ 104199 ]")
![White Willow 12" X 12" (30.5 X 30.5 Cm) Cardstock [ 166703 ]](https://assets1.tamsnetwork.com/images/EC042017NF/166703s.jpg "White Willow 12\" X 12\" (30.5 X 30.5 Cm) Cardstock [ 166703 ]")
![Petal Pink 8-1/2" X 11" Cardstock [ 146985 ]](https://assets1.tamsnetwork.com/images/EC042017NF/146985s.jpg "Petal Pink 8-1/2\" X 11\" Cardstock [ 146985 ]")
![Pool Party 8-1/2" X 11" Cardstock [ 122924 ]](https://assets1.tamsnetwork.com/images/EC042017NF/122924s.jpg "Pool Party 8-1/2\" X 11\" Cardstock [ 122924 ]")
![Basic White 8 1/2" X 11" Cardstock [ 166780 ]](https://assets1.tamsnetwork.com/images/EC042017NF/166780s.jpg "Basic White 8 1/2\" X 11\" Cardstock [ 166780 ]")
![Golden Glow Classic Stampin' Pad [ 167676 ]](https://assets1.tamsnetwork.com/images/EC042017NF/167676s.jpg "Golden Glow Classic Stampin' Pad [ 167676 ]")
![Stampin' Cut & Emboss Machine [ 149653 ]](https://assets1.tamsnetwork.com/images/EC042017NF/149653s.jpg "Stampin' Cut & Emboss Machine [ 149653 ]")


Leave a Reply