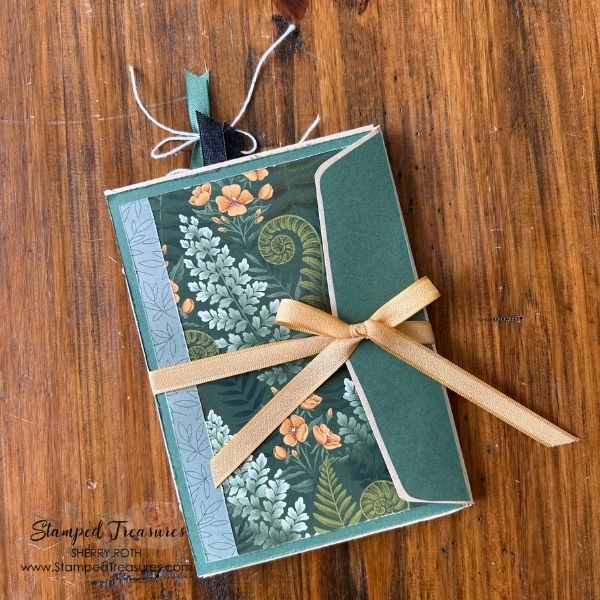
If you’ve been following along with my scrap-focused theme this month, you already know I’m all about stretching supplies and giving new life to what we already have. Today’s project is one of my absolute favourites because it’s simple, versatile, and incredibly satisfying: turning an envelope into a sweet little journal!
The best part? You can use any envelope—brand new, thrifted, or even one that’s already been through the mail. It’s a perfect blend of old and new, polished and playful.
Why an Envelope Journal?
Envelope journals are quick to make, beginner-friendly, and a fantastic way to use up those bits and pieces you’ve been saving. Plus, they’re small enough to finish in one sitting—instant creative gratification! They’re perfect for: junk journaling, memory keeping, gifts and a creative way to play.
Supplies You’ll Need
- An envelope (any condition!)
- Patterned paper (scraps or something fun & new)
- Adhesives (tape runner, liquid glue, etc.)
- Paper trimmer or scissors
- Embellishments (die cuts, ribbon, stickers, etc.) – dig into your stash for these!
- Optional: stamps, ink, journaling cards
Step 1: Prep Your Envelope
Start by folding and trimming your envelope. Mine measures 9-1/2″ x 6-1/2″ and opens on one of the short ends. I started by folding it in half and then doing some trimming so that I have flaps and pockets. Here’s a video showing you how it’s done.
If you’re using a vintage or mailed envelope, embrace the character! Cover only parts of it so those postal marks and textures peek through.
Step 2: Create the Pages
This will be the journal part of the journal. Cut down leftover cardstock, patterned paper, or even packaging to fit inside your envelope. You can either stack pages and staple them into the fold or hole punch and tie with ribbon or twine. I used a 3 hole pamphlet stitch to add mine.
Mix in some pattern paper —to give your journal a cohesive feel while still using up your stash.
Measurements for the journal:
- Moonlit Flora DSP: 9″ x 6-1/4″ and 6″ x 6″
- Insert Pages: these are the grid pages 5 sheets cut down to 9″ x 6-1/4″
- Peaceful Pine: 2″ x 4″ for die cutting leaf
- Soft Sea Foam: 2″ x 3″ for die cutting leaf
- White: scrap for butterfly and 2″ x 6″ piece for the tag
- Peaceful Pine Ribbon: 5″
- White Twine: 8″
Step 3: Decorate the Cover
Think of your envelope as a mini canvas. Layer scrap paper pieces, die cuts (leftover from previous projects!) and/or labels or tags.
This is a great opportunity to combine old favorites with new goodies. That brand-new bundle that hasn’t been inked? Pair it with a background made entirely from scraps—it balances everything beautifully.
If your envelope is the same size as mine, here are the measurements for the front & back covers:
- Peaceful Pine: 4-1/2″ x 6-3/8″ (x2); flaps 1-3/4″ x 6-1/2″ (x2)
- Moonlit Flora DSP: 3-5/8″ x 6″ (front) and 4-1/8″ x 6″ (back)
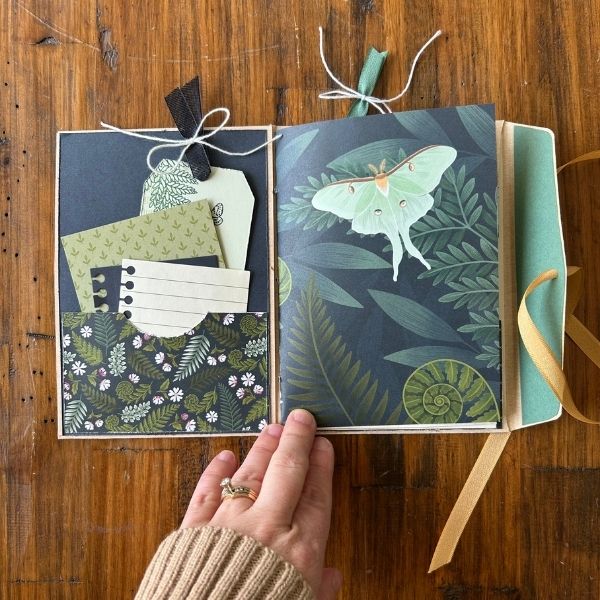
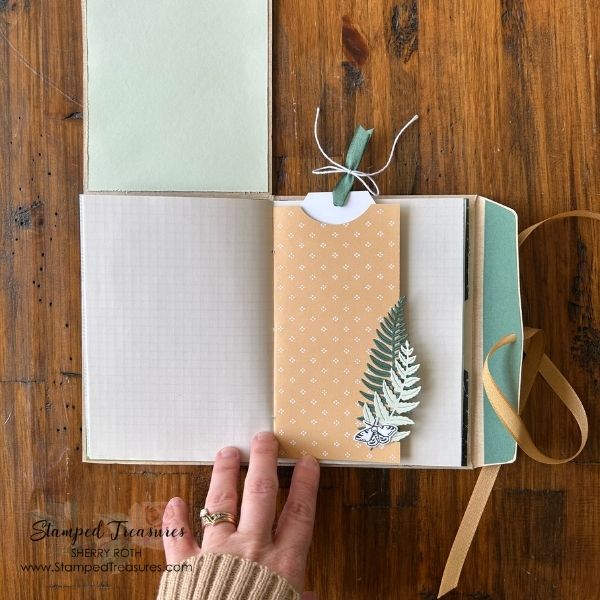
Step 4: Add Interactive Elements
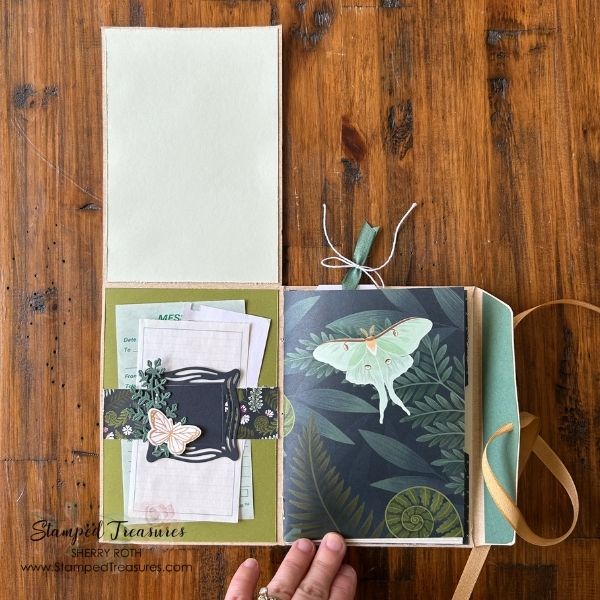
This is my favourite part! It’s time to make your little journal extra special. Incorporate tuck pockets (use the envelope itself!), flip-outs or fold-down pages and hidden journaling spots
Don’t forget to use those scraps. Even tiny scraps can become tabs, pull-out cards or decorative borders. Nothing goes to waste here!
Inside page measurements:
- Secret Sea: 4-3/8″ x 6-3/8″; 3″ x 3″ for die cutting notebook page die; 2-3/4″ x 2-3/4″ for die cutting frame
- Moonlit Flora DSP: 4-1/4″ x 2-1/2″ (pocket); 3″ x 4″ and 1-1/4″ x 4-3/8″
- Soft Sea Foam: 2-1/4″ x 5″ (tag); 4-3/8″ x 6-3/8″
- Notebook Paper: die cut with notebook page die
- Old Olive: 4-3/8″ x 6-3/8″
- Peaceful Pink: 2″ x 3″ (die cutting leaf)
- Basic White: for butterfly
- Secret Sea Rbbon: 4″
- White Twine: 8″
Step 5: Finishing Touches
Tie it all together with: ribbon or twine closure; a stamped sentiment or a cluster of embellishments. This is where your style really comes through—clean and simple, vintage and layered, or somewhere in between.
Why This Project Works So Well
This envelope journal is the perfect example of creative balance:
- Scraps keep it resourceful and low-cost
- New products add polish and cohesion
- Found materials (like thrifted envelopes) bring personality
It’s not about using everything perfectly—it’s about using what you have in a way that feels fun and freeing.
Try This Next
Once you’ve made one, you’ll want to make more—I promise! Try using different envelope sizes or in a seasonal theme. Or challenge yourself to create one using only scraps—you might be surprised at how much you can do.
I’ve created several projects using envelopes over the years. Here are just a few:
Creating from an envelope reminds us that beautiful projects don’t require complicated supplies—just a little creativity and a willingness to play.
If you make one, I’d love to see it!
Until next time,

Supply List
Click on any of these images to shop my Canadian online store or to find out more about any of these products. In addition to these I also used the Extraordinary Life and Fern & Flora bundles, the Golden Glow and Peaceful Pine inks – all of these will be available beginning May 5th, 2026.
![Secret Sea 8 1/2" X 11" Cardstock [ 165624 ]](https://assets1.tamsnetwork.com/images/EC042017NF/165624s.jpg "Secret Sea 8 1/2\" X 11\" Cardstock [ 165624 ]")
![Soft Sea Foam 8-1/2" X 11" Cardstock [ 146988 ]](https://assets1.tamsnetwork.com/images/EC042017NF/146988s.jpg "Soft Sea Foam 8-1/2\" X 11\" Cardstock [ 146988 ]")
![Old Olive 8-1/2" X 11" Cardstock [ 100702 ]](https://assets1.tamsnetwork.com/images/EC042017NF/100702s.jpg "Old Olive 8-1/2\" X 11\" Cardstock [ 100702 ]")
![Basic White 8 1/2" X 11" Cardstock [ 166780 ]](https://assets1.tamsnetwork.com/images/EC042017NF/166780s.jpg "Basic White 8 1/2\" X 11\" Cardstock [ 166780 ]")
![Secret Sea 3/8" (1 Cm) Bordered Open Weave Ribbon [ 166932 ]](https://assets1.tamsnetwork.com/images/EC042017NF/166932s.jpg "Secret Sea 3/8\" (1 Cm) Bordered Open Weave Ribbon [ 166932 ]")
![Baker's Twine Essentials Pack [ 155475 ]](https://assets1.tamsnetwork.com/images/EC042017NF/155475s.jpg "Baker's Twine Essentials Pack [ 155475 ]")
![Secret Sea Classic Stampin' Pad [ 165285 ]](https://assets1.tamsnetwork.com/images/EC042017NF/165285s.jpg "Secret Sea Classic Stampin' Pad [ 165285 ]")
![Soft Sea Foam Classic Stampin' Pad [ 147102 ]](https://assets1.tamsnetwork.com/images/EC042017NF/147102s.jpg "Soft Sea Foam Classic Stampin' Pad [ 147102 ]")
![Take Your Pick [ 144107 ]](https://assets1.tamsnetwork.com/images/EC042017NF/144107s.jpg "Take Your Pick [ 144107 ]")
![Take Your Pick Crafter Tips [ 161602 ]](https://assets1.tamsnetwork.com/images/EC042017NF/161602s.jpg "Take Your Pick Crafter Tips [ 161602 ]")
![Paper Trimmer [ 152392 ]](https://assets1.tamsnetwork.com/images/EC042017NF/152392s.jpg "Paper Trimmer [ 152392 ]")
![Stampin' Cut & Emboss Machine [ 149653 ]](https://assets1.tamsnetwork.com/images/EC042017NF/149653s.jpg "Stampin' Cut & Emboss Machine [ 149653 ]")


Leave a Reply