
Today I’m sharing this simple charming day thanks card. The Charming Day bundle is such a beautiful from the online exclusive section of the Stampin’ Up!® website.
I wanted to create a bit of a different fold for this card. This is an idea that I turn to over and over but mostly when I create pocket cards. Today’s card isn’t a pocket card. There’s an extra panel that folds over onto itself to make the front shorter than the back of the card base.
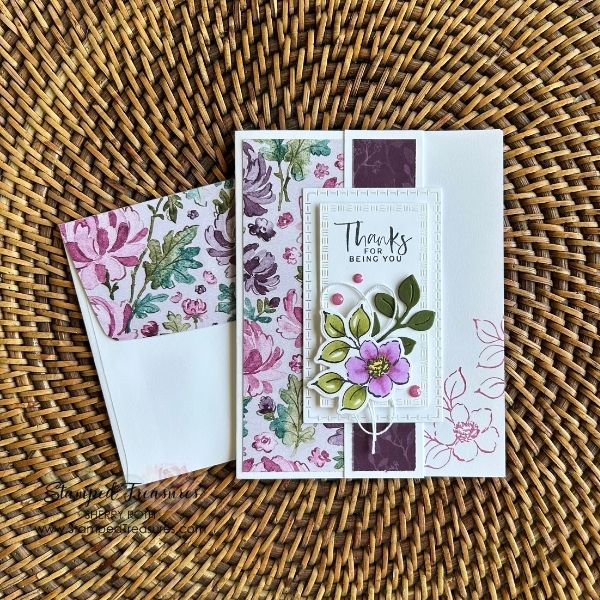
Measurements:
- Thick Basic White: 5-1/2″ x 8-1/2″ scored at 1-1/4″ and 4-1/4″
- Basic White: 2-1/2″ x 8-1/2″ die cut the third and fourth smallest Textured Notes rectangles; 2-3/4″ x 2-3/4″ for stamping
- Floral Charm DSP: 2-3/4″ x 5-1/4″ ; 1″ x 5-1/4″ and 2-1/4″ x 6″ (for the envelope flap)
- Mossy Meadow: 2″ x 3″
- Charming Shimmer Faceted Dots: x3
Instructions:
- Fold the card base so that the centre score line is a mountain fold and the other fold is a valley fold.
- Add the 2-3/4″ x 5-1/4″ piece of dsp to the wider flap and the narrow strip to the folded over flap. Adhere the narrow flap to the wider flap (optional).
- Stamp desired greeting, using Memento ink, onto the smaller of the two rectangles. Add this rectangle to the larger rectangle using dimensionals. Add this to the card front ensuring you add adhesive only to the left side of the rectangle so that you don’t stick your card closed.
- Stamp the smaller flower image using Memento ink and colour in using Stampin’ Blends. I coloured the flower centre in dark lemon lolly; the petals in light berry burst and light & dark fresh freesia and the leaves in light & dark old olive.
- Die cut flower with the coordinating die.
- Die cut the smaller leaf from mossy meadow card stock.
- Add a bit of seal adhesive behind the flower and add twine.
- Adhere leaf and flower to the rectangle. The leaf is flat & the flower is popped up.
- Stamp the flower image a couple times in the lower right corner of the inside of the card. I used berry burst ink, stamped off.
- Finish off with three shimmer dots.
I hope you enjoyed this tutorial!
Until next time,

Shopping List
Click on any of the images to shop my Canadian online store or to find out more information about any of these products.
![Charming Day Bundle (English) [ 166136 ]](https://assets1.tamsnetwork.com/images/EC042017NF/166136s.jpg "Charming Day Bundle (English) [ 166136 ]")
![Floral Charm 12" X 12" (30.5 X 30.5 Cm) Designer Series Paper [ 166125 ]](https://assets1.tamsnetwork.com/images/EC042017NF/166125s.jpg "Floral Charm 12\" X 12\" (30.5 X 30.5 Cm) Designer Series Paper [ 166125 ]")
![Charming Shimmer Faceted Dots [ 166139 ]](https://assets1.tamsnetwork.com/images/EC042017NF/166139s.jpg "Charming Shimmer Faceted Dots [ 166139 ]")
![Textured Notes Dies [ 165555 ]](https://assets1.tamsnetwork.com/images/EC042017NF/165555s.jpg "Textured Notes Dies [ 165555 ]")
![Baker's Twine Essentials Pack [ 155475 ]](https://assets1.tamsnetwork.com/images/EC042017NF/155475s.jpg "Baker's Twine Essentials Pack [ 155475 ]")
![Lemon Lolly Stampin’ Blends Combo Pack [ 161673 ]](https://assets1.tamsnetwork.com/images/EC042017NF/161673s.jpg "Lemon Lolly Stampin’ Blends Combo Pack [ 161673 ]")
![Berry Burst Stampin’ Blends Combo Pack [ 161681 ]](https://assets1.tamsnetwork.com/images/EC042017NF/161681s.jpg "Berry Burst Stampin’ Blends Combo Pack [ 161681 ]")
![Fresh Freesia Stampin' Blends Combo Pack [ 155518 ]](https://assets1.tamsnetwork.com/images/EC042017NF/155518s.jpg "Fresh Freesia Stampin' Blends Combo Pack [ 155518 ]")
![Old Olive Stampin' Blends Combo Pack [ 154892 ]](https://assets1.tamsnetwork.com/images/EC042017NF/154892s.jpg "Old Olive Stampin' Blends Combo Pack [ 154892 ]")
![Basic White 8 1/2" X 11" Thick Cardstock [ 159229 ]](https://assets1.tamsnetwork.com/images/EC042017NF/159229s.jpg "Basic White 8 1/2\" X 11\" Thick Cardstock [ 159229 ]")
![Basic White 8 1/2" X 11" Cardstock [ 166780 ]](https://assets1.tamsnetwork.com/images/EC042017NF/166780s.jpg "Basic White 8 1/2\" X 11\" Cardstock [ 166780 ]")
![Mossy Meadow 8-1/2" X 11" Cardstock [ 133676 ]](https://assets1.tamsnetwork.com/images/EC042017NF/133676s.jpg "Mossy Meadow 8-1/2\" X 11\" Cardstock [ 133676 ]")
![Berry Burst Classic Stampin' Pad [ 147143 ]](https://assets1.tamsnetwork.com/images/EC042017NF/147143s.jpg "Berry Burst Classic Stampin' Pad [ 147143 ]")
![Tuxedo Black Memento Ink Pad [ 132708 ]](https://assets1.tamsnetwork.com/images/EC042017NF/132708s.jpg "Tuxedo Black Memento Ink Pad [ 132708 ]")
![Stampin' Cut & Emboss Machine [ 149653 ]](https://assets1.tamsnetwork.com/images/EC042017NF/149653s.jpg "Stampin' Cut & Emboss Machine [ 149653 ]")


Leave a Reply