
Welcome to the monthly APPT blog hop where we will showcase alternate projects using the July 2025 Sweeter with You Paper Pumpkin kit. I created a fun mini album using this kit but make sure you check out the other blogs (linked below) for additional creative ideas.
For those of you not familiar with Paper Pumpkin kits, they are a crafty subscription kit that gets delivered right to you. Inside are all the supplies you need, and directions, for assembling that months projects. It’s a great way to get a little crafting in each month. Don’t miss out on next months kit. If you’re in Canada, subscribe here, before the 10th of the month in order to receive the August kit. Here’s a hint at what’s to come.

Normally when I receive my kit I create one of each of the projects and then go live with a scrapbook layout idea using the contents. However, this month I was inspired to create a mini album. What a fun way to document your favourite summer memories.
Let’s take a closer look…

The cover was created using a piece of the white backing that comes in our packages of designer series paper. I cut two of the 5th largest party banner dies from it and kept a strip for the spine. It was then covered with a piece of pattern paper from the Storybook Life Workshop kit (on sale while supplies last for just $24!). The inside was covered with a piece of pool party two-tone card stock.
Here’s what you’ll need for the cover:
- 4-1/2″ x 12″ piece of the white back from a package of DSP
- 4-1/2″ x 12″ piece of pattern paper for the cover
- 4-1/2″ x 12″ piece of pool party two-tone card stock
- two 2″ binder rings
- Garden green: 1-1/2″ x 4-1/4″
- Basic Black: 1-3/4″ x 3″ to die cut the word hello from the Circle of Seasons dies
- A leftover piece of the polka dot card base
- Two strawberries, a flower and a pink strip from the Sweeter with You kit
- White twine
- Scraps of white card stock
You can see how it all comes together in the video linked below.
The album is held together by a couple of 2″ binder rings.
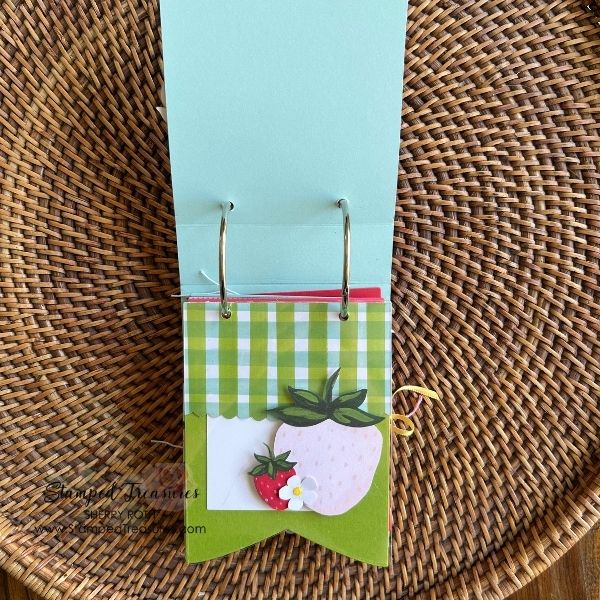
For the inside pages I cut the card fronts, some coordinating card stock and a window sheet using the 6th largest party banner die. They are decorated using the die cut elements from the Sweeter than You Paper Pumpkin kit and the Circle of the Season dies.
I used two envelope flaps stuck back to back to create the look of an awning (the green plaid). It worked perfectly with the scallop detail on the envelopes. This sits as a layer in between the window sheet, which is decorated with the two strawberries and the granny apple green layer. The remaining pieces of envelopes were opened up and then cut down to 2″ x 3″ photo place holders to use throughout the album.
Supplies:
- Granny Apple Green: 4-1/4″ x 5-1/2″ cut with 6th largest party banner
- Window Sheet: 4-1/4″ x 5-1/2″ cut with 6th largest party banner
- Two strawberries & a flower from the kit
- Two envelope flaps

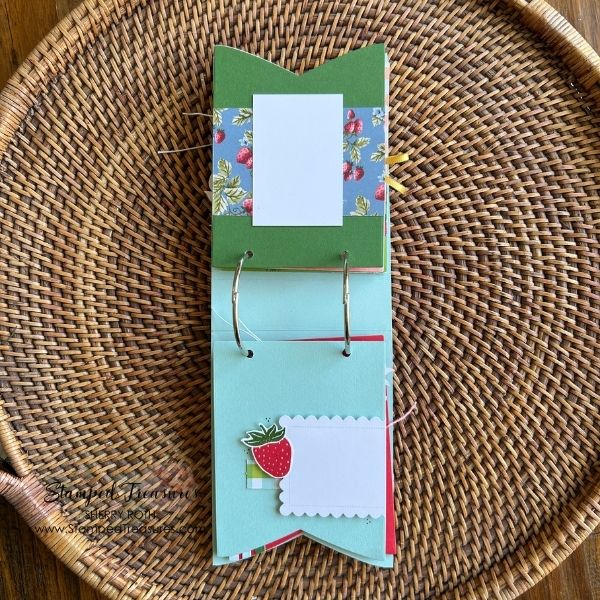
This next page includes one of our 3×3 flip flaps. This allows fro a couple extra photos to be added to this one page. I also used the flower stamp from the stamp set that came in the kit to stamp the background of the granny apple green card stock.
Supplies:
- Strawberry Pattern card base from the kit – cut with the 6th largest party banner die; leftover strip after cutting it out
- Garden Green: 3-1/4″ x 3-1/4″; leftover strip from cutting banner
- Flip Flap: 3×3

I backed the strawberry pattern layer with the plaid pattern card front and used the scallop circle from the kit with a bit of strawberry slush ribbon tucked behind it. This would be a perfect spot for a bit of journaling or a stamped sentiment.
The base of the next page is the large scallop vellum piece that comes in the kit. I die cut some strawberries from the circle of seasons dies and tucked them in and added a flower. To cover the adhesive I added a white piece to the back.

This next page is a strawberry slush banner with a little book attached to it, held closed with some daffodil ribbon. You can see it open in the next photo.

Supplies:
- Strawberry Slush banner
- Basic White: 3″ x 12″ scored at 3″, 6″ and 9″
- Garden Green: die cut circle from the Circle of Seasons dies and 2-3/4″ x 2-3/4″
- Strawberry DSP: 2-5/8″ 2-5/8″
- 2 strawberries and a flower from the kit
- Daffodil Ribbon

The plaid strips on the back of the strawberry slush banner are from the negative space that’s leftover after die cutting the plaid patterned banner. This all makes more sense if you watch the video linked above.
Supplies:
- Strawberry polka dot card base cut with the banner
- Strawberry Slush circle from circle of seasons
- Timid Tiger ribbon 4-1/2″
- White Twine about 8″
I backed the polka dot banner with a banner cut from card green card stock and added a 2-1/4″ x 4-1/4″ piece of dsp. This dsp is from the Storybook Moments dsp pack.
The pool party banner uses half of the scallop rectangle from the Sweeter with You Paper Pumpkin kit, a small piece leftover from the envelope flaps we stuck together and a strawberry.
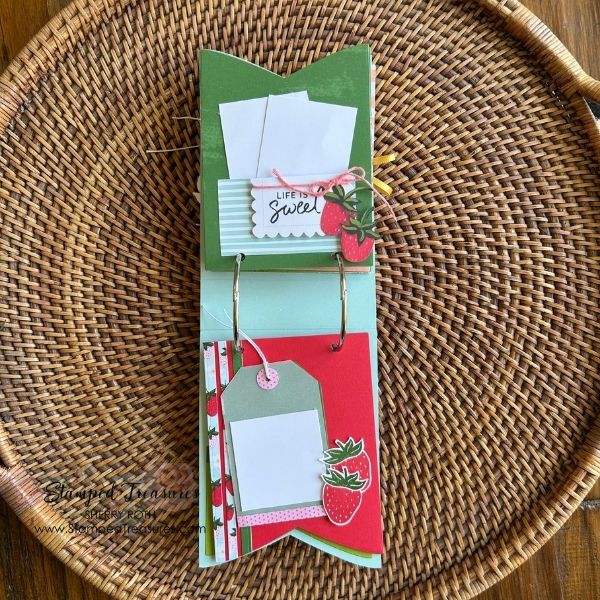
The garden green banner cut from the card front was added to the back of the pool party banner. Then I created a pocket for a couple of photos using the pool party striped piece from the kit.
I stamped Life is Sweet from the ‘ Life is Sweeter with You’ stamp from the stamp set, masking what I didn’t need. That was stamped onto the remaining scallop rectangle piece using memento ink. Then I wrapped some flirty flamingo twine around it and tied a bow. Finishing it off with a couple of strawberries.
Supplies for the poppy parade page:
- Poppy Parade: 4-1/4″ x 5-1/2″ die cut with the 6th largest banner
- Garden Green: 2-1/4″ x 3-1/2″
- Vellum: 2-1/4″ x 3-1/2″
- Scraps left from the strawberry pattern card front, garden green card front and polka dot card front
- 2 die cut strawberries
- White Twine: 6″

Supplies:
- Strawberry slush: 3-1/4″ x 3-1/4″ die cut with smallest hexagon from the Meant to Bee dies
- Poppy parade: 1×3 – die cut 3 flowers from the Circle of Seasons dies
- Granny apple green: 2-1/2″ x 4″ die cut with the banner end of the 6th largest banner
- Garden green: leftover strip
After all your pages are decorated, it’s time to start assembling the album. I walk you through the easiest way to assemble in the video linked above.
Thanks for stopping by! I hope you enjoyed today’s project. For additional inspiration be sure to click on the names below to continue on the hop.
Until next time,

Shopping List
Click on any of the images below to shop my Canadian online store or to find out more information about any of these products. In addition to these, I also used a. Crop-a-Dile; 1/2″ circle punch and vellum. The Sweeter with You Paper Pumpkin kit is no longer available, however, at the time of writing this post, the refill kit is available to subscribers.
![Party Banners Dies [ 165264 ]](https://assets1.tamsnetwork.com/images/EC042017NF/165264s.jpg "Party Banners Dies [ 165264 ]")
![Circle Of Seasons Dies [ 167277 ]](https://assets1.tamsnetwork.com/images/EC042017NF/167277s.jpg "Circle Of Seasons Dies [ 167277 ]")
![Meant To Bee Dies [ 166582 ]](https://assets1.tamsnetwork.com/images/EC042017NF/166582s.jpg "Meant To Bee Dies [ 166582 ]")
![Month By Month Album Retreat 2025 (English) [ 167338 ]](https://assets1.tamsnetwork.com/images/EC042017NF/167338s.jpg "Month By Month Album Retreat 2025 (English) [ 167338 ]")
![Storybook Life Scrapbooking Workshop Kit (English) [ 166634 ]](https://assets1.tamsnetwork.com/images/EC042017NF/166634s.jpg "Storybook Life Scrapbooking Workshop Kit (English) [ 166634 ]")
![Storybook Moments 12" X 12" (30.5 X 30.5 Cm) Specialty Designer Series Paper [ 164662 ]](https://assets1.tamsnetwork.com/images/EC042017NF/164662s.jpg "Storybook Moments 12\" X 12\" (30.5 X 30.5 Cm) Specialty Designer Series Paper [ 164662 ]")
![Daffodil Delight 1/8" (3.2 Mm) Satin Ribbon [ 164715 ]](https://assets1.tamsnetwork.com/images/EC042017NF/164715s.jpg "Daffodil Delight 1/8\" (3.2 Mm) Satin Ribbon [ 164715 ]")
![Strawberry Slush 3/8" (1 Cm) Faux Linen Ribbon [ 165274 ]](https://assets1.tamsnetwork.com/images/EC042017NF/165274s.jpg "Strawberry Slush 3/8\" (1 Cm) Faux Linen Ribbon [ 165274 ]")
![Timid Tiger 3/8" (1 Cm) Faux Linen Ribbon [ 165275 ]](https://assets1.tamsnetwork.com/images/EC042017NF/165275s.jpg "Timid Tiger 3/8\" (1 Cm) Faux Linen Ribbon [ 165275 ]")
![Baker's Twine Essentials Pack [ 155475 ]](https://assets1.tamsnetwork.com/images/EC042017NF/155475s.jpg "Baker's Twine Essentials Pack [ 155475 ]")
![Low Profile Sparkle Dots [ 166157 ]](https://assets1.tamsnetwork.com/images/EC042017NF/166157s.jpg "Low Profile Sparkle Dots [ 166157 ]")
![3" X 3" Flip Flaps Memory Protectors [ 166400 ]](https://assets1.tamsnetwork.com/images/EC042017NF/166400s.jpg "3\" X 3\" Flip Flaps Memory Protectors [ 166400 ]")
![Window Sheets [ 142314 ]](https://assets1.tamsnetwork.com/images/EC042017NF/142314s.jpg "Window Sheets [ 142314 ]")
![Pool Party 12" X 12" (30.5 X 30.5 Cm) Two Tone Cardstock [ 166691 ]](https://assets1.tamsnetwork.com/images/EC042017NF/166691s.jpg "Pool Party 12\" X 12\" (30.5 X 30.5 Cm) Two Tone Cardstock [ 166691 ]")
![Granny Apple Green 8-1/2" X 11" Cardstock [ 146990 ]](https://assets1.tamsnetwork.com/images/EC042017NF/146990s.jpg "Granny Apple Green 8-1/2\" X 11\" Cardstock [ 146990 ]")
![Garden Green 8-1/2" X 11" Cardstock [ 102584 ]](https://assets1.tamsnetwork.com/images/EC042017NF/102584s.jpg "Garden Green 8-1/2\" X 11\" Cardstock [ 102584 ]")
![Poppy Parade 8-1/2" X 11" Cardstock [ 119793 ]](https://assets1.tamsnetwork.com/images/EC042017NF/119793s.jpg "Poppy Parade 8-1/2\" X 11\" Cardstock [ 119793 ]")
![Basic Black 8-1/2" X 11" Cardstock [ 121045 ]](https://assets1.tamsnetwork.com/images/EC042017NF/121045s.jpg "Basic Black 8-1/2\" X 11\" Cardstock [ 121045 ]")
![Basic Black Stampin' Write Marker [ 162481 ]](https://assets1.tamsnetwork.com/images/EC042017NF/162481s.jpg "Basic Black Stampin' Write Marker [ 162481 ]")
![Basic Black Stampin' Blends Combo Pack [ 154843 ]](https://assets1.tamsnetwork.com/images/EC042017NF/154843s.jpg "Basic Black Stampin' Blends Combo Pack [ 154843 ]")
![Granny Apple Green Stampin' Pad [ 147095 ]](https://assets1.tamsnetwork.com/images/EC042017NF/147095s.jpg "Granny Apple Green Stampin' Pad [ 147095 ]")
![Tuxedo Black Memento Ink Pad [ 132708 ]](https://assets1.tamsnetwork.com/images/EC042017NF/132708s.jpg "Tuxedo Black Memento Ink Pad [ 132708 ]")
![Foam Adhesive Sheets [ 152815 ]](https://assets1.tamsnetwork.com/images/EC042017NF/152815s.jpg "Foam Adhesive Sheets [ 152815 ]")
![Stampin' Cut & Emboss Machine [ 149653 ]](https://assets1.tamsnetwork.com/images/EC042017NF/149653s.jpg "Stampin' Cut & Emboss Machine [ 149653 ]")


Leave a Reply